
Alcohol inks are a great process art material. They are easy to use and they can create some beautiful effects. However, compared to some of the projects we do, they aren’t cheap, and neither is the special applicator you often need to use with them. While you do need an applicator, you don’t need to buy one. It’s actually really easy to make your own DIY alcohol ink applicator. This is a really simple applicator and you may well already have everything you need in the house. They are particularly great if you are doing alcohol ink projects with kids who don’t want to share an applicator.
This post contains affiliate links (identified with a *) I earn a commisson from qualifying purchases
What You Need to Make an Alcohol Ink Applicator
Some Foldback Clips – You can use any size of foldback clips* but think about the size that might be useful for your project when making your choice
Some felt – Any kind will do, you can buy it online* or pick it up at the shops
Some scissors – To cut the felt with
And that’s it!

How to Make an Alcohol Ink Applicator
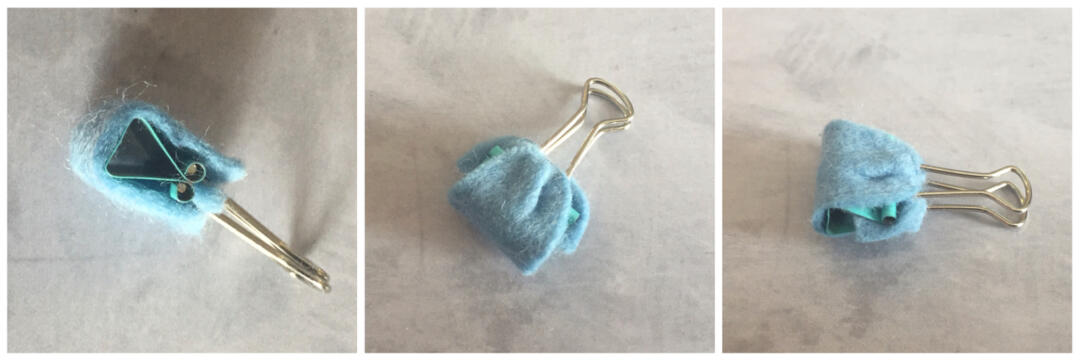
First of all, you need to cut your felt to size. It should be the same width as your foldback clip and about 6 times as long.
Once you have cut the felt to size, with the clip arms up, attach the clip to one end of it, as shown below.

Next, you need to thread the felt through both clip arms.

Then you need to put the other end of the fabric into the clip. Your felt should now be wound around your clip.
Now, close the clip arms so they are together and straighten the felt over the bottom of the clip. That’s it, you’re done!
Once you’ve done one and are happy with the results, you’ll need to cut some more felt in the same size as you’ll need a new piece each time you change the colour of alcohol ink you are using.
How to Use your DIY Alcohol Ink Applicator
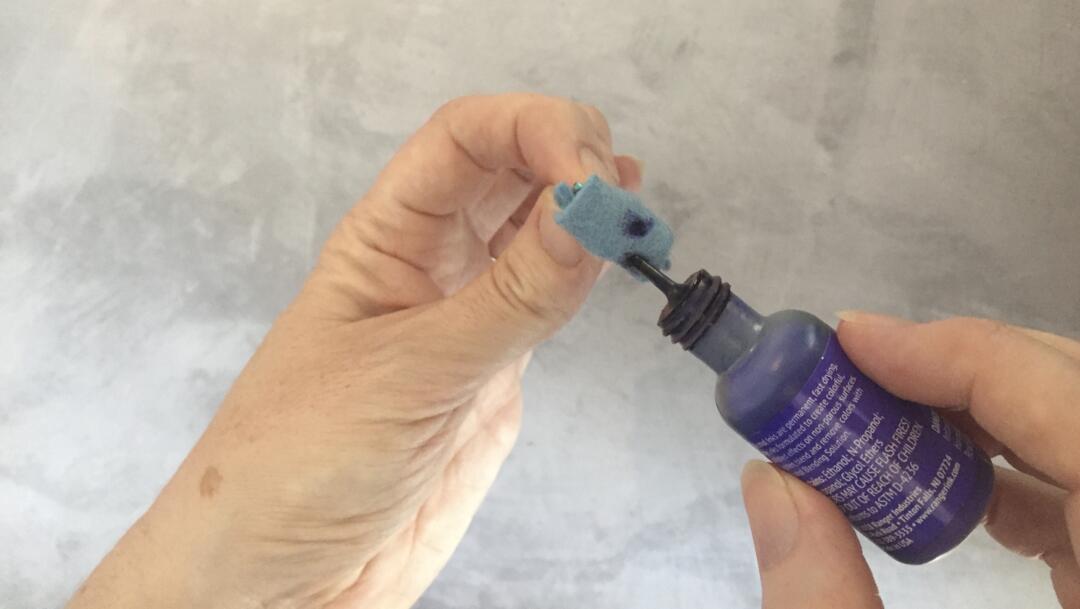
To use your applicator, simply drip your chosen colours onto the bottom of your applicator and apply it to your chosen surface. You can press it, swirl it or drag it, each will create a different effect. When you want to change colours, simple remove and dispose of the felt and add a clean piece of felt in the same way you did with the first.
If you’re looking for some alcohol ink projects, how about some coasters, some bookmarks or some christmas tree baubles?
Enjoyed this Post? Why not Pin it for Later!

Leave a Reply