Let me start by saying I am not a crafter. I don’t like it and I don’t possess the attention to detail to be good at it. What I do like is process art. In process art, the means of creating the art is clearly part of the end piece. My favourite kind of process art involves melting stuff. Every year, the kids and I create Christmas tree decorations to give as gifts to teachers. I’ve no idea if teachers like this sort of thing but I can’t imagine they want another “Best Teacher” mug either. For the last three years we’ve made the decorations by melting stuff. You can also check out our melted beads Christmas Tree Decorations and our alcohol ink baubles.
This post contains affiliate links (identified with a *) I earn a commisson from qualifying purchases
Equipment You’ll Need to Make Crayon Decorations
The equipment for this one is fairly simple. Firstly, you need crayons, lots of them. If you like to frequent restaurants with your children you will have likely gathered a large collection of crayons from the packs they give out in the hope of stopping children screaming the place down while they wait for their food. If you don’t have any, Crayola* ones melt the quickest but any cheap crayons will do the job.
You will also need a silicone mould in suitably festive shapes. You want fairly large moulds so avoid anything that identifies itself as suitable for ice cubes. You also want to stick to fairy chunky shapes, things with small spindly parts will be difficult to remove from the mould and also break very easily, particularly with kids around. Stars* are good because you could feasibly use them at other times of the year but you might want to go all out festive. Snowflakes* also work well, as do Christmas Trees*.
You’ll need an oven, a baking tray and some foil to protect it. Some kind of string or ribbon is also good assuming you want to hang the finished masterpiece on the tree.

How to Prepare your Crayons
The first job is to peel the labels off your crayons. Initially your children will love this job. They will then realise that actually it’s fiddly and boring and will go and play while you finish it (At least that’s five minutes peace!). Next, the crayons need to be broken in to smaller pieces, ideally of similar size in order that they melt at a similar speed. Kids love breaking stuff so there’s no chance you’ll be doing this alone. You may need to use a knife if you’ve got particularly thick crayons but thin ones can just be snapped into pieces by the children.
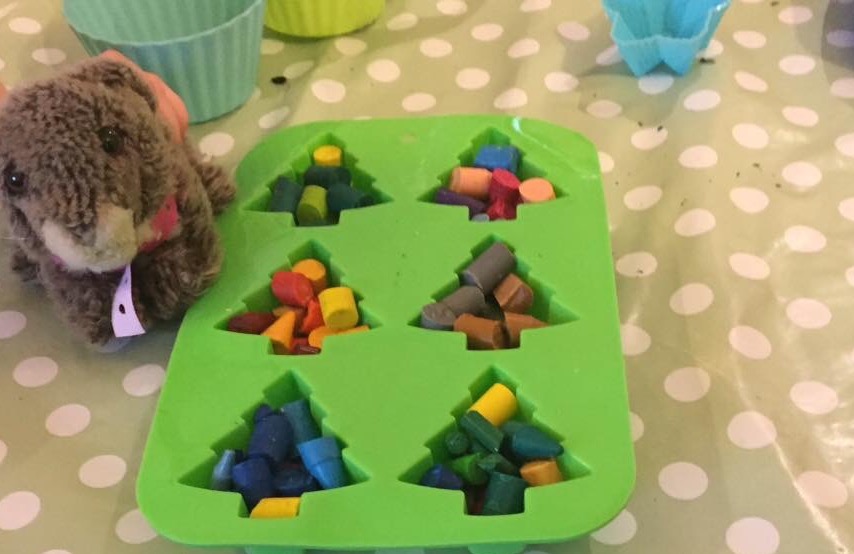
Once they were broken up I put ours into bowls, putting similar colours together. This could be educational for younger children but I just did it because it looked pretty! Don’t discount the boring colour crayons, that one on the picture with browns and greys actually produced a rather Sophisticated looking crayon decoration! We didn’t have any white in this batch but you’ll also get good effects with that, although not all packs of crayons include it.

Creating your Melted Crayon Decorations
Once that’s done you can get creative by combining different colour combinations in the moulds. The children will either put all of the same colour in a mould or one of every colour in a mould. Whichever way they go you will sulk because they aren’t as pretty as you could have made them if you were left to your own devices. I recommend reserving a mould for yourself to avoid feeling too resentful. You need to make sure each mould is fairly full, this will make them easier to get out and give you a fairly sturdy end result (great for when kids/cats/dogs/drunk husbands knock them off the Christmas tree).

Cover your baking tray with the foil and pop the moulds on the tray. Heat the oven to 150 degree centigrade and bake your melted crayon Christmas tree decorations for 10 minutes.
Adding String to your Melted Crayon Christmas Tree Decorations
After 10 minutes, take them out and have a poke at them with a knife to see if they are all melted. If they aren’t, put them back in and keep checking on them every few minutes (if you’re anything like me, use a timer or you will forget). Once they are melted take them out of the oven. Cut your string in to 6 inch pieces and tie it in to a loop. Before the melted crayon Christmas tree decorations have cooled down too much push one end of the loo in to the decoration. Repeat this for each one.
Alternatively, you can wait until they have cooled and hardened, heat a metal skewer or similar in hot water and use it to poke a hole through them. As they will quite thick you’ll probably need to keep warming the skewer back up in the hot water. There is a risk that you’ll break the crayon decorations while doing this which is why we used the other method but the finished decoration will hang better in your tree if the string is added this way.

It’s best to let them cool overnight if you can convince your kids to wait that long as that way you can be absolutely sure they are set. Once they are, simply (it is simple, I promise) pop them out of the moulds.
So there you have it, how to make melted crayon Christmas tree decorations in order to avoid having to buy teacher’s Christmas gifts. You might also like my other posts about seasonal process arts.
If you know of any other great process art that involves melting stuff, do share it in the comments!

Leave a Reply