
We love a bit of process art in our house and even more so when the result is something we can give as a gift to family and friends. In this sharpie coaster tutorial we’re looking at how to make beautiful marbled sharpie coasters with kids.
This post contains affiliate links (identified with a *) I earn a commisson from qualifying purchases
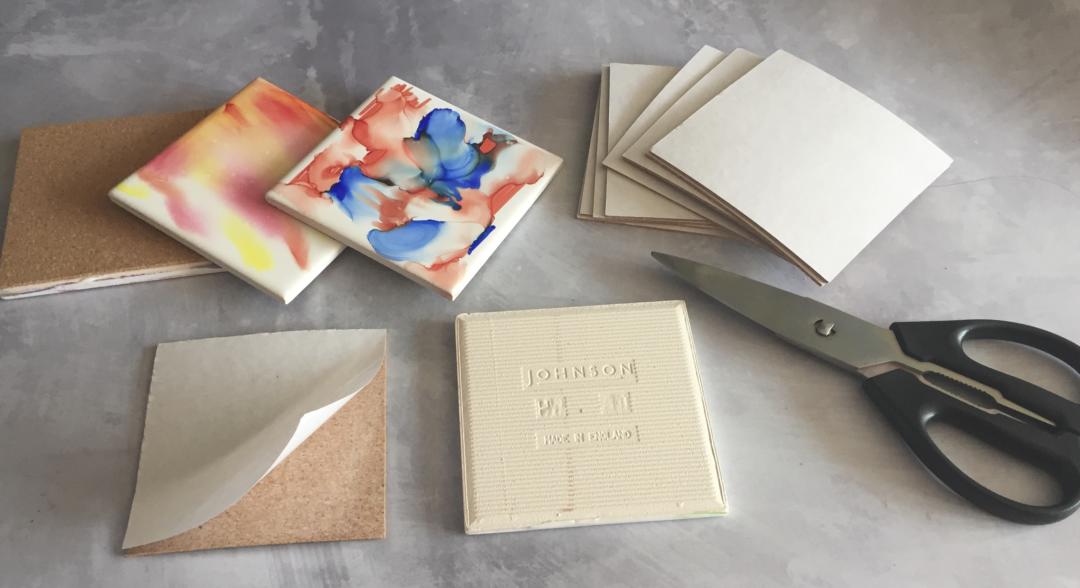
What you Need to Make Sharpie Tile Coasters
- Ceramic tiles – While you can buy ceramic tiles specifically for crafts like this, we just bought a box of 26, small (100mm by 100mm) white tiles from a DIY shop.
- Colourful Permanent markers – you can use sharpie brand* if you like but we actually used Amazon brand permanent markers* which worked well and were great colours.
- Rubbing Alcohol* – also know as Isopropyl alcohol. You’ll need a high one, something like 90% plus. One in a spray bottle is ideal as it adds to the ways you can apply it but if you already have some in the house in a regular bottle that will work fine too.
- Some kitchen roll – too take off excess colour and rubbing alcohol
Optional items:
- A dropper (or you can use one of the thirty odd old Calpol syringes you have in the drawer)
- A small sponge
- A small paintbrush
- Polyurethane top coat spray*
- Cork Backing*

Things to Bear in Mind Before Starting your Sharpie and alcohol Coasters
The markers are permanent so if the kids get them on their clothes, they won’t come off. A firm talking to or old clothes are essential. If you get the pen on your hand, you’ll be able to remove most of it with some of the rubbing alcohol.
Rubbing alcohol is toxic if drunk, so you’ll need to supervise children carefully with it. While it can be drying to the skin the amount they are likely to get on them doing this activity shouldn’t cause any problems. They are likely to be exposed to much more of it using hand sanitiser which is made from rubbing alcohol.
How to Make Sharpie Coasters with Rubbing Alcohol
Before you start making your Sharpie dyed coasters it’s a good idea to put some old newspaper or a table cover down.
When you’re ready to start, choose which colours you’d like to start with for your first design. I mostly used just two or three colours per tile but the children tried a few rainbow designs that worked well too.
Once you’ve chosen, start colouring in patches on your tile. You don’t need to cover the whole tile but you need an even spread of colours across the tile’s surface as you see below.
Once that’s done it’s time for the fun bit! If you have your rubbing alcohol in a spray bottle, hold it around 20cm away from your tile and give it a squirt or two. You’ll see the sharpie marker pen start to dissolve. Pick up your tile and tilt it in one direction and then another until the surface of the tile is completely covered. If you have a lot of liquid left let it gather in one corner and use a piece of kitchen towel to mop it up carefully, without touching the main part of your tile. Leave it somewhere to dry, how long it takes will depend on how much alcohol you use but it’s best to leave them for an hour or so to be safe.

Other Methods for Applying the Rubbing Alcohol
We experimented with a a few different methods for applying the rubbing alcohol and each one gave a slightly different result. In the image blow you can see the results of, spraying, using the dropper, using a sponge and using a brush in two different ways.
For each method you begin the same way by colouring patches of our ceramic tile with the colours you like.
With the dropper, you fill it with the rubbing alcohol and then place drops of it on your tile. You can do a few drops, tilt it about, and then add more drops where you feel necessary. This method gives you more control than spraying but a less even result, which in itself looks pretty good. You’ll find that it changes quite a bit as it dries, usually for the better so give it some time before you decide if you like the result or not.
If you want to try a sponge, you just need to dip it into the rubbing alcohol and then gently press it over the surface of your coaster. Its important not to carry on for too long otherwise your colours will blend together and there wont be much of a pattern.
To use a brush, simply dip it in the rubbing alcohol and brush it across the tile in smooth strokes, its best to just go in one direction to avoid the colours becoming muddy. Alternatively, you can use the brush to dab the alcohol on and blend the colours together.

Don’t Like the Result? Just Start Again!
What I love the most about sharpie and alcohol tiles is the fact that if you don’t like it, you just clean it off and start again. Simply apply a good amount of rubbing alcohol to the tile and rub it with some kitchen roll, repeat until its clean. Once the tile is dry your ready to go again.

How to Seal Sharpie on the Ceramic Tiles
If you don’t seal the tiles unfortunately the colour will slowly wear off and will come right off if you wash them. We sealed ours with a polyurethane top coat spray. We chose the gloss finish which works well. The spray is fairly unpleasant so do it outside or in a well ventilated room, away from the children.

Using Cork to Turn the Tiles into Coasters
To make the coasters sit nicely on surfaces (and not scratch any delicate ones) you can use self adhesive cork backing. I bought ones that were the same size as my tiles and just trimmed about 10mm off of two sides so they sit just inside the edge of the tile. Then simply peel off the backing and stick on to the bottom of the ceramic tile.
And that’s it! Hopefully you’ve now got some beautiful marbled sharpie coasters that you can give as gifts to family, friends or even teachers. If you’ve enjoyed making coasters, you might also enjoy these alcohol ink tile coasters. If you’d like to try some other types process art projects with your children check out these melted crayon cards. If you’d like to do more with the pens, the Sharpie website has some great ideas.
Enjoyed this post? Why not pin it for later!

Can you cover finish work with mod podge to protect it?
I haven’t ever tried it, my thinking is it would work as long as it didn’t smear the design in the process of applying. Maybe do a test one first to be sure.
Do you use glossy or matte tiles for this project?
Glossy 🙂
These look brilliant. What a fab idea. I love that every one is a one of a kind x